
Queremos que ciertos dispositivos de nuestra red MikroTik salgan a internet a través de un VPS propio con WireGuard, en lugar de usar la conexión WAN directa.
Infraestructura:
- VPS con IP pública
203.0.113.10(Ionos/cualquier proveedor) - MikroTik RouterOS 7.x
- Subred WireGuard:
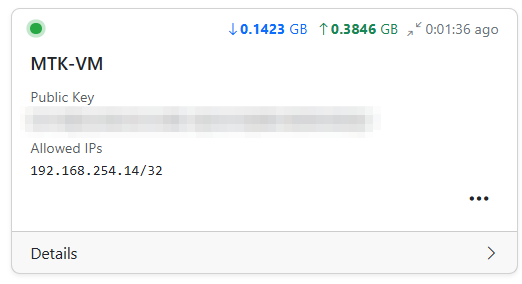
192.168.254.8/29 - IP del VPS en el túnel:
192.168.254.9 - IP del MikroTik en el túnel:
192.168.254.14
Parte 1 — Configuración del VPS
1.1 Instalar WGDashboard
git clone https://github.com/WGDashboard/WGDashboard.git
cd WGDashboard/src
chmod +x ./wgd.sh
./wgd.sh install
./wgd.sh start
Accede en http://TU_IP_VPS:10086 con usuario admin / contraseña admin. Cámbiala inmediatamente.
1.2 Configurar el firewall del VPS (UFW)
ufw allow 22/tcp
ufw allow 443/tcp
ufw allow 10086/tcp       # WGDashboard (restringe a tu IP si puedes)
ufw allow 10444/udp       # Puerto WireGuard
ufw enable
1.3 Habilitar IP forwarding
echo "net.ipv4.ip_forward=1" > /etc/sysctl.d/99-wireguard.conf
sysctl -p /etc/sysctl.d/99-wireguard.conf
Nota: Usamos
/etc/sysctl.d/99-wireguard.confen lugar de/etc/sysctl.confporque en sistemas modernos con systemd este directorio se procesa de forma más fiable durante el arranque. El prefijo99asegura que se aplica al final, evitando que otro archivo lo sobreescriba. Si se usa/etc/sysctl.confel valor puede volver a0tras un reinicio, cortando todo el tráfico del túnel.
1.4 Permitir forwarding de WireGuard hacia internet
IMPORTANTE: Ten en cuenta que «ens6» es la interfaz de Wireguard en mi caso, en el tuyo probablemente se llame de otra manera por lo que deberás sustituirlo en todos los comandos donde aparezca.
ufw route allow in on vpn-wg out on ens6Edita /etc/default/ufw y deja:
DEFAULT_FORWARD_POLICY="DROP"1.5 Configuración de la interfaz WireGuard en el VPS
El archivo /etc/wireguard/vpn-wg.conf debe quedar así:
[Interface]
Address = 192.168.254.9/29
SaveConfig = true
PostUp = iptables -t nat -A POSTROUTING -s 192.168.254.8/29 -o ens6 -j MASQUERADE
PostDown = iptables -t nat -D POSTROUTING -s 192.168.254.8/29 -o ens6 -j MASQUERADE
ListenPort = 10444
PrivateKey = PRIVATE_KEY_VPS

[Peer]
# MikroTik
PublicKey = PUBLIC_KEY_MIKROTIK
AllowedIPs = 0.0.0.0/0
1.6 Añadir el peer del MikroTik
wg set vpn-wg peer PUBLIC_KEY_MIKROTIK allowed-ips 192.168.254.14/32
wg-quick save vpn-wg
También lo podéis añadir fácilmente desde la GUI:
Parte 2 — Configuración del MikroTik
2.1 Crear la interfaz WireGuard
/interface wireguard add name=VPN_VPS mtu=1412 listen-port=51821
/interface wireguard print
Anota la Public Key que genera MikroTik automáticamente — es la que hay que registrar en el VPS como peer.
2.2 Añadir la IP a la interfaz
/ip address add address=192.168.254.14/29 interface=VPN_VPSImportante: Usar
/32y no/29para evitar que MikroTik trate toda la subred WireGuard como red local y no la enrute por el túnel.
2.3 Crear el peer hacia el VPS
/interface wireguard peers add \
  interface=VPN_VPS \
  name=VPN_VPS1 \
  public-key="PUBLIC_KEY_VPS" \
  endpoint-address= IP_PUBLICA_WIREGUARD_VPS \
  endpoint-port=10444 \
  allowed-address=0.0.0.0/0 \
  persistent-keepalive=21s
2.4 Añadir rutas
/ip route add dst-address=0.0.0.0/0 gateway=VPN_VPS routing-table=VPN_VPS distance=10Ambas rutas van en la tabla
VPN_VPS, no enmain. El tráfico llega a esta tabla gracias al routing mark aplicado por el mangle.
2.5 Address list con los dispositivos que saldrán por el VPS
/ip firewall address-list add list=G_VPS_USERS address=192.168.10.10 comment="Mi dispositivo"
2.6 Mangle — marcar el tráfico hacia el VPS
/ip firewall mangle add \
  chain=prerouting \
  action=mark-routing \
  new-routing-mark=VPN_VPS \
  passthrough=no \
  src-address-list=G_VPS_USERS \
  dst-address-list=!N_PRIVATE \
  comment="to_VPS"
2.7 NAT — masquerade del tráfico que sale por el túnel
/ip firewall nat add \
  chain=srcnat \
  action=masquerade \
  src-address-list=G_VPS_USERS \
  dst-address-list=!N_PRIVATE \
  out-interface=VPN_VPS \
  comment="IPP_VPS"
2.8 Ajuste de MSS para evitar problemas con paquetes grandes
/ip firewall mangle add \
  chain=forward \
  action=change-mss \
  new-mss=1280 \
  passthrough=yes \
  tcp-flags=syn \
  protocol=tcp \
  src-address-list=G_VPS_USERS \
  dst-address-list=!N_PRIVATE \
  out-interface=VPN_VPS \
  comment="CHANGE_MSS"
Parte 3 — Verificación
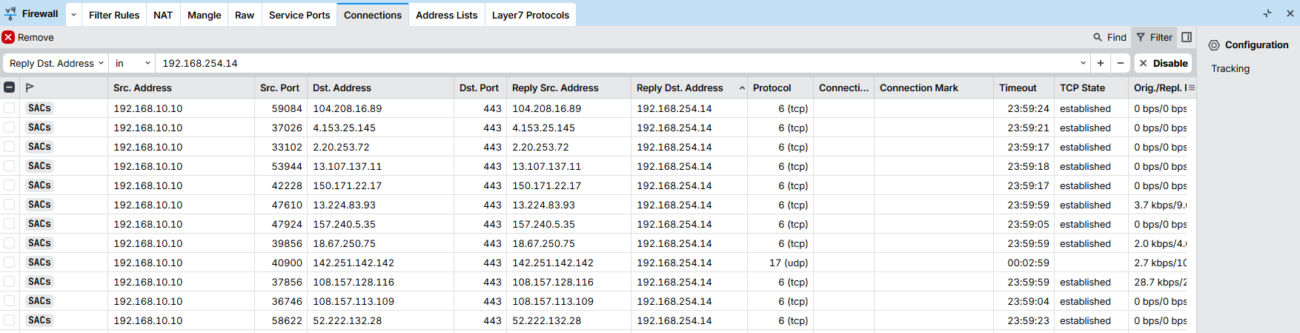
En el VPS
# Ver estado del túnel
wg show vpn-wg

# Ver tráfico entrante por el túnel
tcpdump -i vpn-wg -n

# Verificar NAT y forwarding
ufw status verbose
iptables -t nat -L POSTROUTING -n -v
En MikroTik
# Ver peers y handshake
/interface wireguard peers print detail

# Ver tráfico en la interfaz
/tool sniffer quick interface=VPN_VPS

# Verificar rutas
/ip route print where gateway=VPN_VPS

# Ping de prueba al VPS por el túnel
/ping 192.168.254.9 src-address=192.168.254.14
Parte 4 — Autostart tras reinicio
4.1 WireGuard
systemctl enable wg-quick@vpn-wg4.2 WGDashboard
cat > /etc/systemd/system/wgdashboard.service << EOF
[Unit]
After=syslog.target network-online.target
Wants=wg-quick.target
ConditionPathIsDirectory=/etc/wireguard

[Service]
Type=forking
PIDFile=/root/WGDashboard/src/gunicorn.pid
WorkingDirectory=/root/WGDashboard/src
ExecStart=/root/WGDashboard/src/wgd.sh start
ExecStop=/root/WGDashboard/src/wgd.sh stop
ExecReload=/root/WGDashboard/src/wgd.sh restart
TimeoutSec=120
PrivateTmp=yes
Restart=always

[Install]
WantedBy=multi-user.target
EOF

systemctl daemon-reload
systemctl enable wgdashboard
Ajusta la ruta
/root/WGDashboard/srcsi instalaste WGDashboard en otro directorio.
Puntos clave
- La Public Key de la interfaz WireGuard de MikroTik se genera automáticamente — es la que hay que registrar en el VPS como peer.
- La IP de la interfaz en MikroTik debe ser
/32, no/29, para evitar que trate la subred como local. - El fasttrack de MikroTik puede interferir con el enrutamiento por marca — añade las IPs del túnel a la lista de exclusión del fasttrack.
- El routing mark debe coincidir exactamente entre el mangle y la tabla de rutas.
- UFW bloquea el forwarding por defecto — hay que permitirlo explícitamente solo para la interfaz WireGuard con
ufw route allow in on vpn-wg out on ens6. - Sin Persistent Keepalive el MikroTik no inicia la conexión activamente — ponlo a 21 segundos.